


If you've ever watched a mechanic swap out a tire in minutes or seen a carpenter drive dozens of nails without breaking a sweat, chances are they were using pneumatic tools. These air-powered devices are common in workshops, construction sites, and even home garages. They're fast, reliable, and built to last-if you know how to use and care for them properly.
This guide walks you through the basics of pneumatic tools: what they are, how they work, the most common types, and how to choose and maintain them.
What Are Pneumatic Tools?
Pneumatic tools run on compressed air. Instead of electricity or batteries, they use air pressure supplied by an air compressor. That pressurized air flows through a hose into the tool, where it spins a motor or drives a piston to create motion.
You'll often hear them called "air tools." The name comes from the Greek word "pneuma," which means breath or air. These tools have been around for over a century, but modern versions are lighter, more efficient, and easier to handle than ever before.
Why Choose Pneumatic Tools?
There are plenty of reasons people prefer air-powered tools over electric or cordless options. Here are the biggest advantages:
- Power and speed: Pneumatic tools deliver consistent torque and high RPMs without overheating.
- Durability: With fewer electrical parts, they tend to last longer and handle tough conditions better.
- Lightweight: Since the motor is powered externally by the compressor, the tool itself stays light and easy to control.
- Safety: No sparks or electric currents mean safer use in flammable or wet environments.
- Cost-effective: Once you own a compressor, adding new air tools is usually cheaper than buying equivalent electric models.
Of course, there are trade-offs. You need an air compressor and hoses, which means less portability. But for regular or heavy-duty use, the benefits often outweigh the drawbacks.
Key Parts of a Pneumatic System
Before you start using air tools, it helps to understand the main components that make the system work.
Air Compressor
This is the heart of your setup. The compressor takes in ambient air and squeezes it into a storage tank at high pressure-usually between 90 and 120 PSI (pounds per square inch). When you pull the trigger on your tool, that stored air rushes out to do the work.
Air Hose
The hose connects your tool to the compressor. Look for one that's flexible, kink-resistant, and rated for your system's pressure. Most standard hoses are 1/4 inch or 3/8 inch in diameter.
Fittings and Couplers
These small connectors join the hose to the tool and compressor. Quick-connect couplers let you swap tools fast without losing much air. Make sure all your fittings match-mismatched parts cause leaks and pressure drops.
Regulator and Filter (Optional but Recommended)
A regulator lets you fine-tune the air pressure going to your tool. Some tools need less pressure than your compressor delivers, and running them too hot can cause damage. An inline air filter removes moisture and debris that could clog or corrode your tool over time.
Common Types of Pneumatic Tools
Dozens of air-powered tools exist, but a few stand out as must-haves for most users.
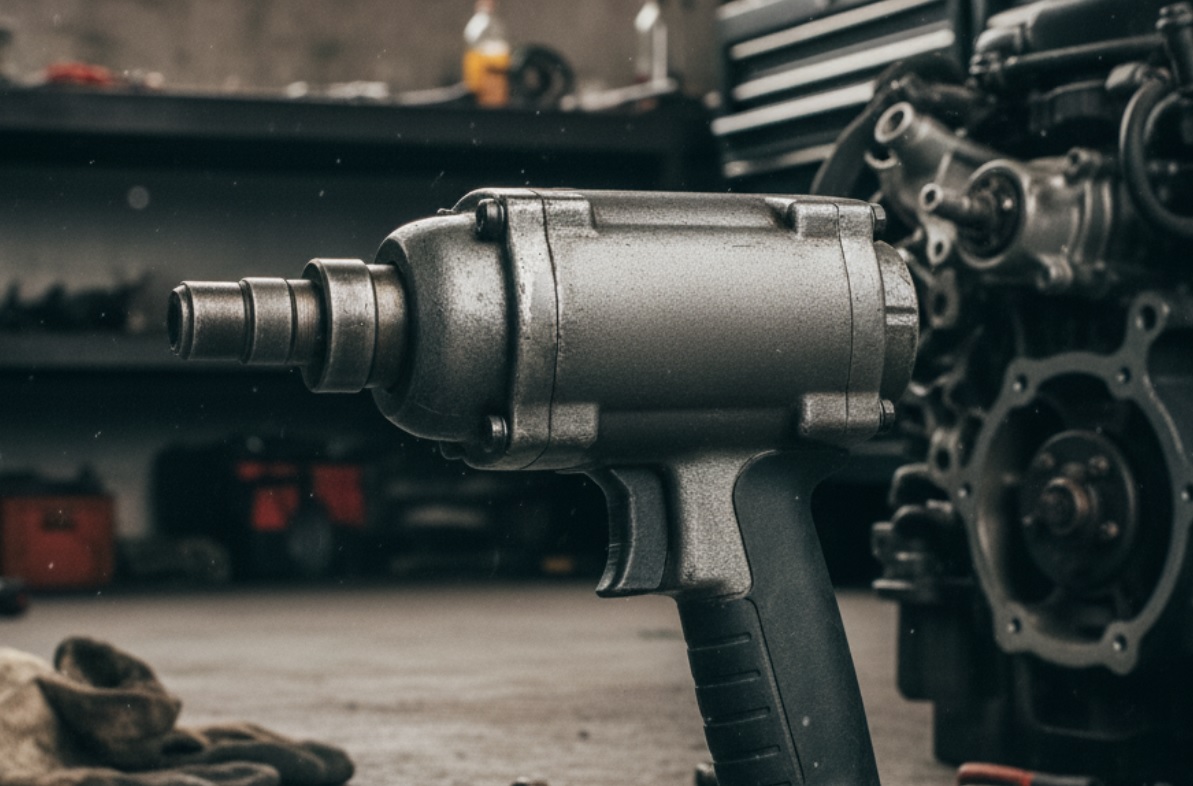
Air Impact Wrench
This is the go-to tool for loosening stubborn lug nuts or tightening bolts quickly. Auto shops use them daily because they deliver massive torque with minimal effort. You'll find them in different drive sizes-1/4", 3/8", 1/2", and even 1"-depending on the job.
Air Ratchet
Smaller and lighter than an impact wrench, an air ratchet is perfect for tight spaces where a full swing isn't possible. It won't break bolts loose like an impact wrench, but it speeds up assembly and disassembly tasks.
Brad Nailer and Finish Nailer
Carpenters and woodworkers love these for trim work, cabinetry, and furniture. Brad nailers shoot thin 18-gauge nails, while finish nailers use slightly thicker 15- or 16-gauge nails. Both leave small holes that are easy to fill and paint over.
Air Stapler
Great for upholstery, insulation, or attaching wire mesh. Air staplers drive staples quickly and evenly, saving your hands from repetitive strain.
Die Grinder
This high-speed rotary tool is used for grinding, sanding, polishing, or cutting metal and plastic. Attach different bits for different jobs-it's like a Dremel on steroids.
Air Hammer (or Rivet Gun)
Used for chiseling, breaking concrete, or setting rivets. Some models come with interchangeable chisels for demolition or shaping metal.
Paint Sprayer
For smooth, even paint finishes on cars, furniture, or walls, an air-powered sprayer beats brushes and rollers every time. Just be sure to strain your paint and clean the gun thoroughly after use.
How to Choose the Right Pneumatic Tool
Picking the best tool depends on your needs, budget, and existing equipment. Keep these tips in mind:
- Match the tool to your compressor. Check the tool's CFM (cubic feet per minute) requirement and make sure your compressor can supply it at the recommended PSI. Running a tool underpowered leads to poor performance and wear.
- Consider your workspace. If you're working in a garage, portability matters less. On a job site, a compact, oil-free compressor might be better.
- Look at build quality. Metal housings last longer than plastic, but add weight. Balance durability with comfort.
- Read user reviews. Real-world feedback often reveals quirks or reliability issues that specs won't show.
- Don't ignore noise levels. Some air tools are loud-over 90 decibels. If you'll use them often, consider hearing protection or quieter models.
Basic Safety Tips
Air tools are powerful, and that means they demand respect. Follow these safety rules every time you use them:
- Always wear safety glasses. Flying debris is a real hazard.
- Use hearing protection if the tool is loud.
- Never point an air tool at yourself or others-even without a fastener, compressed air can cause serious injury.
- Disconnect the air hose before changing bits, nails, or staples.
- Check hoses and fittings for cracks or leaks before each use.
- Keep your work area clean and dry to avoid slips or electrical hazards near the compressor.
Maintenance: Keep Your Tools Running Smoothly
With proper care, pneumatic tools can last decades. Neglect them, and they'll wear out fast or fail unexpectedly. Here's how to maintain them:
Lubrication
Most air tools need a few drops of pneumatic tool oil before each use. Add the oil through the air inlet, then run the tool for a few seconds to distribute it. This keeps internal parts moving smoothly and prevents rust.
Don't overdo it-too much oil can cause buildup or leak out during use. Check your manual for exact recommendations.
Drain Your Compressor Tank
Moisture builds up in the tank as air compresses. If you don't drain it regularly, water can enter your tools and cause corrosion. Open the drain valve at the bottom of the tank after each use or at least once a week.
Clean Air Filters
If your compressor has an air intake filter, clean or replace it as needed. A clogged filter makes the motor work harder and reduces efficiency.
Store Properly
Hang hoses to prevent kinks. Store tools in a dry place, preferably in a case or on a pegboard. Keep nails, staples, and bits in labeled containers so they don't get lost or damaged.
Check for Wear
Inspect O-rings, seals, and trigger mechanisms periodically. If a tool starts leaking air, losing power, or making strange noises, it's time for service or replacement parts.
Setting Up Your First Air Tool System
If you're new to pneumatics, start simple. A basic setup might include:
- A 20- to 30-gallon oil-lubricated air compressor (around 150 PSI max)
- A 25- to 50-foot 3/8-inch air hose
- One or two quick-connect couplers
- An inline regulator/filter (highly recommended)
- Your first tool-maybe a brad nailer or impact wrench
Run the compressor in a well-ventilated area, away from dust and moisture. Let it build pressure fully before connecting a tool. Always turn off and unplug the compressor when not in use.
Bottom Line
Pneumatic tools might seem complex at first, but they're so simple once you understand the basics. They save time, reduce fatigue, and deliver professional results, even in a home workshop.
The key to success with air tools is using it wisely and caring for it consistently. With a little attention, your pneumatic setup will serve you well for years to come.
Frequently Asked Questions (FAQ)
Do I need a big compressor for pneumatic tools?
Not necessarily. Small pancake compressors (6 gallons or less) work fine for nailers or staplers used occasionally. For impact wrenches or sanders that run continuously, you'll need a larger tank (20+ gallons) and higher CFM output.
Can I use any air hose with my tools?
Technically yes, but not all hoses perform the same. Longer or narrower hoses cause pressure drops. Use a hose rated for at least 150 PSI and match the diameter to your tool's needs-3/8 inch is standard for most heavy-duty tools.
How often should I oil my air tools?
Add 2-5 drops of pneumatic oil before each use. If you use a tool all day, you might oil it mid-shift too. Always follow the manufacturer's instructions.
Are pneumatic tools louder than electric ones?
Some are, especially impact wrenches and hammers. Others, like nailers, are relatively quiet. Noise varies by model-check decibel ratings if sound is a concern.
Can I use my air compressor for other things?
Absolutely. Many people use compressors to inflate tires, clean keyboards with air blowers, or power airbrushes for art and crafts. Just make sure accessories are compatible with your system's pressure.
What's the difference between oil-lubricated and oil-free compressors?
Oil-lubricated compressors last longer and run cooler but require occasional oil changes. Oil-free models are lighter and maintenance-free but may wear out faster under heavy use.


